Knitted Baby Rat
by Diane, knitting@hhgerbilry.com
© Copyright July 5, 2007 by Diane Nott. All rights reserved.
Original design by http://www.thedietdiary.com/blog/lucia/250
Baby rat pattern
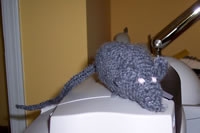
Posted on 05.04.05 by lucia @ 6:24 am
“Is not Rat. Is Siberian Hamster.”
We don’t need to worry this one will scurry around and getting us in trouble with the building inspector. My little Basil is not as as developed the Hamster from Fawlty towers; he doesn’t have legs. I knit Basil as a prototype. I figured I should do that before I move on to making a full sized one like Rogetein, who I showed yesterday. I like Basil’s general shape, ears, and tail. Plus, since he’s knit with short rows, I don’t need to knit circular on double pointed needles, which I don’t enjoy! (And, I can easily adapt this to machine knitting!)
My plan is: Knit Jim’s cardigan, and chart out the larger version of Basil at the same time. If people like Basil enough, I may write the whole thing as a generator. Then, people can scale this up to a longer rat, a fatter rat, whatever!
As to knitting Basil, I think he’s a fun project for learning short rows. Short rows are easy, but for some reason provoke anxiety with beginning knitters. The advantage of learning on the rat is that you’ll probably use cheap yarn, and you don’t really need to worry about messing up a whole sweater with badly worked short rows.
When teaching yourself short rows, just remember: Yes, you do work as described. Turn the work before you finish the row.
The purpose of wrapping and turning is to avoid little holes. If you have problems with wrapping and turning, remember to look to the side bar on the right side of my blog. I have an illustrated “lesson”– just click, and you’ll see the stitch being slipped, yarn being brought forward etc.
I hope you like this little rat!
Materials:
- Left over yarn. Thicker yarn makes a larger rat; thinner yarn makes a shorter rat. (I used a few ounces of Woolease.)
- Needles suitable for the yarn. I used 4-mm (US Size 5) diameter straight needles– this project is knit back and forth in row.
- Tapestry needle.
- A little pink yarn for the eyes.
- Two double pointed needles in a diameter suitable for the yarn.
- Something to cut yarn with.
- I think that’s all!
Directions:
- 30 stitches.
- Row 1: Knit all stitches.
- You will now work decreasing short rows. The shape is different on the two sides. Notice, the number of stitches you left unknit when you turn on purl side facing rows always increases by 2, that is, you leave 2 unknit, then 4, then 6, and finally 8. The number left unknit on knit side facing rows increases by 4; that is they are 4, 8, 12, 16. This makes the nose pointy and the butt rounder.
- Row 2: Purl until 2 stitches remain on left hand needle. [Slip next stitch, turn work — knit side facing — bring yarn forward as to purl, slip next stitch, bring yarn back. This is a “wrap and turn” at the end of the purled short row. Tip: When the number of stitches in the short rows is decreasing by more than 2 each time you work across, you may, if you wish, slip an additional stitch after you turn, but make sure the yarn is held on the wrong side of the work when you do this. This can smooth out the short rows.]
- Row 3: Knit until 4 stitches remain on left hand needle. [Bring yarn forward as to knit, slip next stitch, bring yarn back as to work, turn work, slip next stitch. This is a “wrap and turn” at the end of the knit short row.]
- Row 4: Purl until 4 stitches remain on left hand needle. Wrap and turn.
- Row 5: Knit until 8 stitches remain on left hand needle. Wrap and turn.
- Row 6: Purl until 6 stitches remain on left hand needle. Wrap and turn.
- Row 7: Knit until 12 stitches remain on left hand needle. Wrap and turn.
- Row 8: Purl until 8 stitches remain on left hand needle. Wrap and turn.
- Row 9: Knit until 16 stitches remain on left hand needle. Wrap and turn.
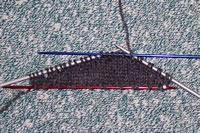
- I took some stitches off on a double pointed needle and took a photo. Notice you’ve make a little “wedge”.
- Row 10: Purl until 5 stitches remain on left hand needle. Wrap and turn.
- Row 11: Knit until 11 stitches remain on left hand needle. Wrap and turn.
- Row 12: Purl until 3 stitches remain on left hand needle. Wrap and turn.
- Row 13: Knit until 7 stitches remain on left hand needle. Wrap and turn.
- Row 14: Purl until 1 stitches remain on left hand needle. Wrap and turn.
- Row 15: Knit until 3 stitches remain on left hand needle. Wrap and turn.
- Row 16: Purl to the end of the row.
- Repeat rows 1-16 three more times. (That is, counting the first time, you do this a total of 4 times.) If you want a chubbier rat, repeat one more time. Bind off, leaving a long strand of yarn to sew up tummy.
- You will start to see the knitting curl around itself and bulge out in the middle. There are very few rows at the nose and butt and lots at the tummy.
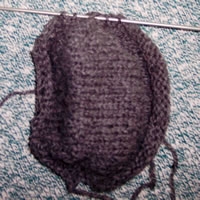
- Tail: Pick up 5 stitches the “butt” end of the rat. I did this by sticking a double pointed needle through 5 stitches, as illustrated. and then knit up.
- Work i-cord over the 5 stitches. I knit the tail until it was as long as the rat. When the cord is 1/3 as long as you’d like the tail, knit 2 stitches together to leave only 4 stitches for the i-cord. When it’s 2/3 as long as you’d like, knit 2 together again. When it’s almost a long as you want, work 2 stitches together again; these leaves 2 stitches. When it’s as long as you like, break yarn, thread a tapestry needle, draw yarn through the two loops and pull.
- Stuff body with filling. Sew bind off row to cast on row to close cavity.
- Ear: Cast on 4 stitches. Work 2 rows in stockinette. On next row, increase two stitches on each edge. Work 1 more rows. Bind off tightly to gather up ear a bit. Knit a second ear. (See ear variation below)
- Pin ears to rat and sew on. Tidy loose ends.
- Embroider 2 little eyes with pink yarn. (I just made three little parallel dashes of yarn to cover exactly one stitch.
- For a rat this small, you could cast on 5 stitches and make little i-cord cord legs and attach. Then, if you are good at embroidery, embroider some haunches.
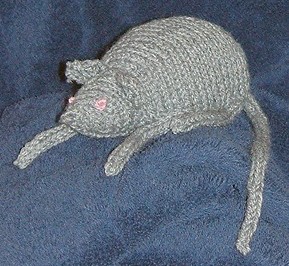
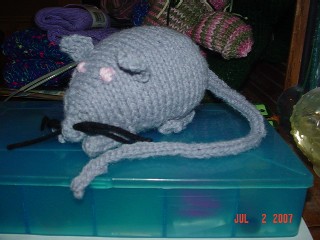
New Ear Pattern
I improved on the ear a little making it a little more pointy. (gerbilgal)
Cast on 6 stitches:
Row 1: Knit Across
Row 2: Knit Across
Row 3: K2 tog, k2, K2 tog (4 stitches)
Row 4: Knit across
Row 5: K2 tog twice (2 stitches)
Row 6: Knit across
Row 7: Knit 2 tog. Fasten off
A Mole is Born!
http://www.xanga.com/MamaMoo13
Yesterday, I blogged about National Mole Day (October 23rd). With the help of a pattern I found on Knitting Fiend's blog and some minor changes, I am proud to announce the birth of our newest baby mole. We are calling her "Shake That Mole Thang" since she has come to us in psychedelic colors!! My dd may have something to say about the name, but she is with a friend at Disneyworld for the entire weekend. Here are pics of the new baby:
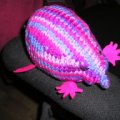 Front
Front 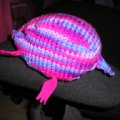 back and saying "Huh?"
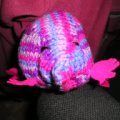
Basically, what I changed from Knitting Fiend's pattern was I modified the tail and added felt feet with the appearance of claws. The eyes I made with dashes of black Perle 8 cotton to simulate their inability to see. I suspect there will be a few more moles in the next couple of weeks as you know how they multiply exponentially !!


 Front
Front  back and saying "Huh?"
